Sale!
VIEW INSTALLATION INSTRUCTIONS


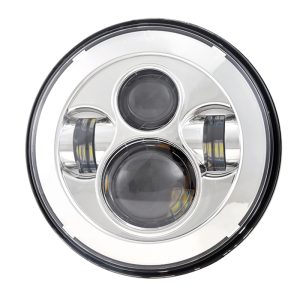
800/1500 Classic & Nomad LED Headlight Adapter
BEFORE ORDERING VERIFY PART COMPABILITYVIEW INSTALLATION INSTRUCTIONS
Original price was: $89.00.$79.00Current price is: $79.00.
In stock
Sold Individually
Tommy Dolka –
This adapter completely changed the riding experience for me. The factory reflector and halogen bulb were always underwhelming and made night riding feel limited. I even tried upgrading to an LED bulb in the stock reflector, while it helped slightly, it never reached the level where I felt fully confident after dark. This adapter finally made it possible to install Day Maker replicas on my Vulcan, and the difference is truly night and day. The build quality feels solid, and it seems like a part that will last the life of the bike.
hinklegravy –
I ride my motorcycle to work and I travel on rural/wooded roads before the sun is up. The ability to do an LED conversion on my VN1500N to safely ride in the dark is a game changer. The installation was completed in less than an hour and the fitment is great. Thanks for the quality product and the R&D that you put into it.
Now the snow needs to melt so I can ride again.
greenbluered38563 (verified owner) –
***Install instructions***
Trying to put this together with no instructions was a little difficult so I didn’t make a video as it was all trial and error. First remove the old headlight from the bikes housing, then there is four screws on the back of the factory headlight bracket holding it to the original headlight. You need that bracket so you’ll need to undo the for screws holding it together. One of the adjustable screws with the spring will also need to be removed as it is attached to the factory headlight housing that is attached to the light. Once that is off, install the adapter bracket to your new LED headlight as shown in the instructional video for the other Kawasaki bikes. Once the adapter is installed you take your factory headlight bracket and install it onto the new headlight. If the bracket won’t fit flush with the two mounting holes at the 3 and 9 o’clock positions then the bracket needs to be rotated. You know it’s right when the beam adjustment screws are lined up. It was a hard time putting the adjustment screws back in place because of the springs so it helps if you have the mounting screws in on the sides that are opposite from the adjustment screws you are attempting to reinstall. It was the hardest part of the whole installation but hopefully one of you will find an easier way to do it. All in all the bracket works as intended and I now have an LED light installed on the bike